Instructions on using the Jack Audio Connection Kit in Windows
Navigation: Go to End of Page
The Jack Audio Connection Kit for Windows
The Jack Audio Connection kit is a tool that allows audio connections (inputs and outputs) to be plugged in and out from each other, just as one would plug audio cables in and out from a mixing sounddesk. In Windows there are two connection possibilities, native Jack connections, or ASIO connections that use the JackRouter driver. There are already some existing *native* JACK for Windows applications (these are audio applications that use the JACK API directly) like:
[foo-yc20]
[SND-RT]
And, of course, our jOrgan Fluidsynth-Jack backend!
Native Jack applications can make use of the full power of the JACK audio and MIDI connection system (for instance, they can open or close Jack connections from within the application, rather than having to set an ASIO driver to use use JackRouter), also the use of natively provided Jack ports provides the ability to sync audio streams between applications. The JackRouter JACK/ASIO driver is "only" there so that users are able to use ASIO applications (like our jOrgan - fluidsynth/portaudio-ASIO driver) in the context of JACK, but this connection obviously has some limitations that native application won't have.
Jack uses a 'Server <-> Client' architecture to supply the audio connection between your sound device and the ASIO application(s). When you run Jack PortAudio, this starts the Jack Audio Server. Once the Jack Audio Server is running, the JackRouter driver is then able to create connections between clients (ASIO applications) and the Jack Audio Server. These connections can be seen in the Jack Control -> Connect Screen.
If the Jack Audio Server is not running, then neither the JackRouter nor the Jack Driver connection will be available to your application(s), and an error report may be shown.
Installation
Download the Jack Audio Connection Kit for Windows from the Windows section of the Jack Audio downloads page
Run the Jack_v1.9.xx_setup.exe. This will install the Jack Audio Connection Kit application and drivers
In your Start menu you will now find the Jack folder
64-bit JackRouter
If you used the Installer for Windows 64 bit (Windows 7): Mixed 64/32 bit JACK , the Jack/64bits/JackRouter.dll still has to be registered manually using the regsvr32 command - so open a command prompt and type in the following command to register the 64-bit JackRouter:
regsvr32 "C:\Program Files (x86)\Jack\64bits\JackRouter.dll"
Be sure to unregister previous versions before installing the new one. If you un-install the Jack Audio Connection Kit please unregister the JackRouter.dll first.
regsvr32 -u "C:\Program Files (x86)\Jack\64bits\JackRouter.dll"
Troubleshooting Tip
If you are unable to register the 64-bit JackRouter
In Windows Explorer navigate to C:\Windows\System32
Right click on "cmd.exe" (you might not see the file extension .exe if you have not customized your default file view) and chose "Run As Administrator" from the context menu
This opens an administration command prompt, now change directory to where you installed Jack for Window (i.e. use cd "C:\Program Files (x86)\Jack\64bits"
Once the command prompt shows that you are in the Jack 64-bit folder enter regsvr32 JackRouter.dll at the prompt
JackRouter 64-bit should now register correctly
You can exit the administration command prompt by typing in exit and pressing the Enter key
The reason that this has to happen manually is that the installer is 32-bit process which installs the 32-bit and 64-bit files, takes care of registering the 32-bit portions, but cannot call a 64-bit process to register the 64-bit portions - that's just the way computers (and Windows) work.
Windows XP 64-bit and Windows Vista 64-bit
The official release of Jack for Windows only supports Windows XP and Vista in the 32-bit installer. Please contact me for an experimental 64-bit version for WinXP 64-bit and Vista 64-bit.
Configuration
Start the Jack Control GUI
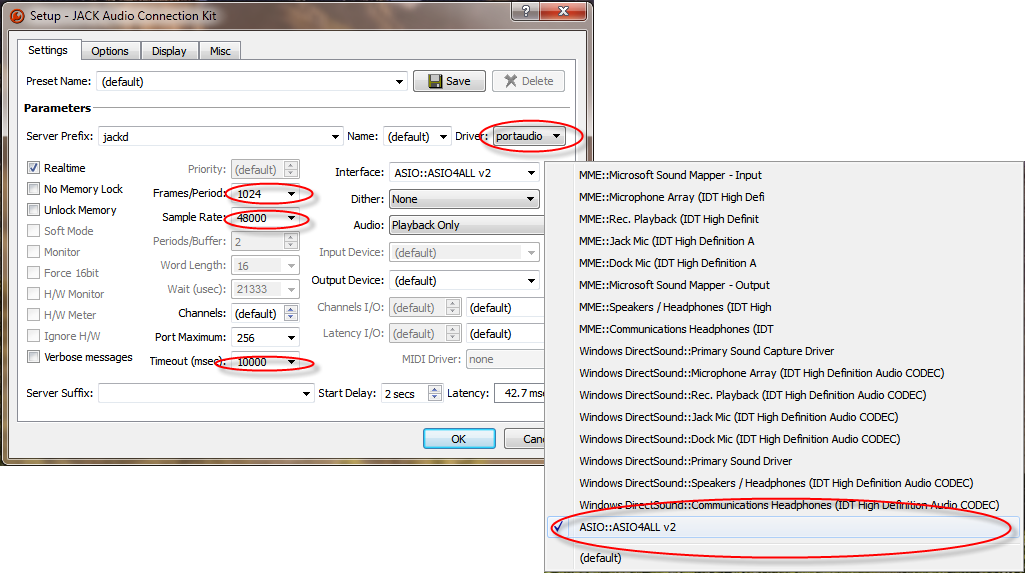
Click on the Setup button
Now configure your settings using the following screenshot as a guide
Select the portaudio driver in the Driver drop down (if it is not already pre-selected)
Use the ">" button on the Interface field to select the Audio device that you wish to use. Jack for Windows currently provides connections to your audio hardware using WMME, Dsound, and ASIO drivers.
Match the Sample Rate setting to the one that your Audio device is set to (typically 44100 or 48000)
Start with a setting of Frames/Period = 1024, but adjust this value lower for less latency once you have tested things
Set the Timeout value to higher than the default (just to give the Jack Audio Server a bit more breathing space as it starts up)
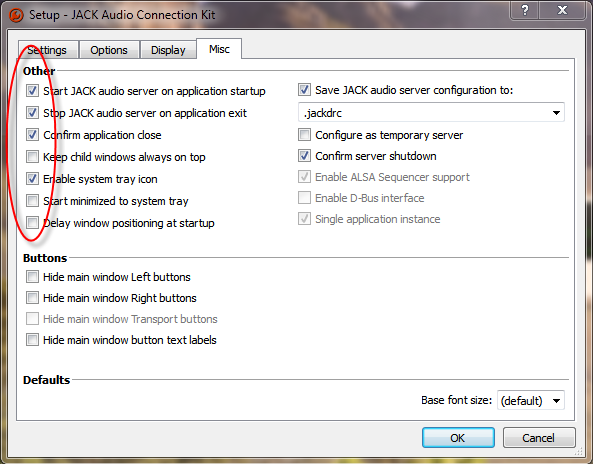
Now click on the Misc tab
Use the following screenshot to configure the Miscellaneous settings:
This sets Jack Control to automatically start the Jack Audio Server when you start Jack Control, as well as place a Jack icon on your task bar
Finally, go back to the Settings tab and click on the Save button
Click on OK to exit the Setup dialogue
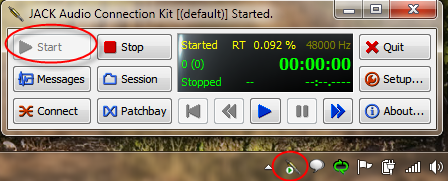
Now you're ready to start the Jack Audio Server, click on the Start button
You should now see something like this:
If your screen does not show the yellow Started indicator, then please contact me at [email protected] for further assistance
Manual Configuration for the JackPortAudio ShortCut
If you have configured the Jack Audio Server using the above section, you can skip this one - this is an advanced section for those who want to hardcode the shortcut or to learn about starting jack from the command line.
From the Windows Start menu, locate the Jack folder and right click on Jack Portaudio icon, then select 'Send to Desktop' (this will place a shortcut on your desktop)
Now go to your desktop and right click on the Jack PortAudio shortcut, and then select 'Properties' (use right click to open 'Properties')
Add the following information to the 'Target' property: "C:\Program Files\Jack\jackd.exe" -R -S -d portaudio -d "ASIO::ASIO4ALL v2"
Click on OK. [This configures Jack to use the ASIO4ALL v2 driver, if you have another ASIO device configure the 'Target' property with that device name]
For a list of all the audio devices that Jack can connect to, open a Command Prompt, change directory to the Jack folder (i.e. cd "c:\Program Files (x86)\Jack\") then run this command: jackd -d portaudio -l (that's an 'ell' for List, not a 'one') , this will present you with the list of supported devices.
Again, from the Windows Start menu, locate the Jack folder and right click on the Jack Control icon, then select 'Send to Desktop' (placing a Jack Control shortcut on your desktop)
You will now have the Jack PortAudio icon (which starts the Jack Audio Connection Kit's audio server), and the Jack Control icon (which allows you to configure the connections between ASIO programs and your hardware). The sequence of usage is to start with the Jack PortAudio icon, allow the audio server to start, and then start Jack Control.
Connections
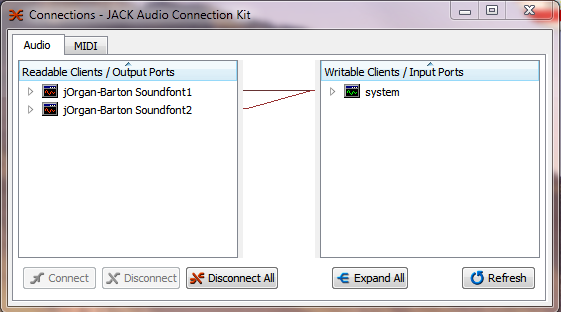
Use the Jack Control Connect button to load the connections screen. This screen will show you what connections have been made, and what inputs and outputs are available for connecting with each other.
By default, JackRouter is set to provide 4 Input and 4 Output connections. This setting can be customized to suite your needs by editing the JackRouter.ini file within your C:\Program Files\Jack folder (in Windows Explorer, right click on the file and choose the 'Edit' option). Change the settings in the [IO] portion of the file.
Connecting ASIO Audio to VST Reverb using the Jack Audio Connection Kit for Windows
Download SAVIhost from [savihostnk.zip] (Savihost is a VST Host that loads just one VST application, making it ideal for our use)
Once you've downloaded SAVIHost and decompressed the zip, copy the savihost.exe to the folder that has the reverb's VST dll files
Rename savihost.exe to [the_name_of_the_VST_dll].exe (for example ....)
Right click on the newly created exe file and select 'Send to Desktop' to create a desktop icon for the reverb application
Run jOrgan with a Fluidsynth PortAudio ASIO disposition
Configure the Fludisynth Sound element to use the JackRouter device
Run your VST Reverb
Configure the Savihost VST to use JackRouter
In Jack Control's Connections tab connect the output (left side panel) fluidsynth audio stream to the input (right side panel) of the VST Reverb
Check that the output (left side panel) of the VST Reverb is connected to the input (right side panel) of your system configuration (i.e. your speakers)
Test and report
Also see Using_Jack_Connections_with_VST_Effects
Free VST Reverb Applications
Freeverb3 VST
Read about Freeverb3 at [freeverb3.sourceforge.net/]
Download freeverb3 VST from [freeverb3_vst] (note: There are a few different versions of freeverb3 VST, depending on your CPU, you'll probably need freeverb3_vst-fast-x87-singleprecision version)
You'll also need download some impulses response wav files to use as a reverb... [Where to Get Impulse Responses]
HybridReverb2
Read about on HybridReverb2 at [www2.ika.rub.de/HybridReverb2/], then follow the download link there to get the VST installer
Reverberate LE
Read about and download Reverberate LE from [www.liquidsonics.com/software_reverberate_le.htm]
You can use Reverberate's own application to receive and send JackRouter audio
NOTE: The Reverberate LE link above is the only one in this section currently working.
Navigation


